5.6 KiB
Gin(九):生成restful接口
经过前面几章节的学习,基本对 Gin 中的一些概念和函数有所了解和掌握,也知道如何在代码中对其进行使用,那么接下来,我们将目光回到很久很久以前,具体多久呢?估摸着就是你在学习第二章 Gin 路由 的时候。
今天,不在模板上做文章了,而是要开启新的章节,我们叫它 restful。
restful 是什么
说到 restful 相信很多乃至大量的朋友们都不陌生,如果你已经知道那就直接看下一个章节,但还是有很多小伙伴是第一次接触,那么这里就简单介绍一下restful。
简单的说 restful 就是一种 接口定义风格,比如说之前我们的接口对于更新用户可能这样定义, /update_user 对于获取当前用户可能是 get_user ,删除当前用户为 /delete_user ,而现在使用 restful 风格的接口,那么我们对于更新用户的接口定义为 /user,获取用户定义为 /user ,删除用户为 /user 。
所以一个完整的 restful 请求需要加上请求方式。对于更新用户我们的接口应该是用 update 请求 /user,对于获取用户应该用get请求方式/user,对于删除用户应该用delete请求/user 接口。
这里只对 restful 请求方式做最简单的介绍。
第一个接口
我们现在来进行一个关于文章接口的展示,仍旧是连接上数据库,数据存在数据库中。
首先建立数据库,仍旧是在我们之前使用的数据库上建立新的表 article ,下面为建表语句,并且连接数据库。
create table article (
	id int auto_increment
		primary key,
	type varchar(20) null,
	content text not null
);
首先我们要有一个模型来和表结构对应,也用于我们接收前端的数据绑定。
新建 model 文件夹,在 model 文件夹中建立 article.go
type Article struct {
	Id      int    `json:"id"`
	Type    string `json:"type"`
	Content string `json:"content"`
}
通过标注 json 来进行对前端数据获取是的绑定。
接下来就可以完成第一个功能了,向数据库新增一个 article 。在 article.go 中完成向数据添加数据的代码,这里代码不做解释,和之前一致。
func (article Article) Insert() int {
	result, e := initDB.Db.Exec("insert into `article` (type, content) values (?, ?);", article.Type, article.Content)
	if e != nil {
		log.Panicln("文章添加失败", e.Error())
	}
	i, _ := result.LastInsertId()
	return int(i)
}
完成 model 层,就可以完成 handler
在 handler 下新建 article/articleHandler.go 。
我们首要要获取前端穿过来的数据。通过 context.ShouldBindJSON 来对数据进行绑定。如果绑定成功,则调用我们上面写的增加方法进行添加。当完成后,通过 context.JSON 返回 json 数据。
func Insert(context *gin.Context) {
	article := model.Article{}
	var id = -1
	if e := context.ShouldBindJSON(&article); e == nil {
		id = article.Insert()
	}
	context.JSON(http.StatusOK, gin.H{
		"id": id,
	})
}
最后,我们完成对应的路由。
在 initRouter 中的 SetupRouter 中完善路由配置。
articleRouter := router.Group(""){
		// 添加一篇文章
		articleRouter.POST("/article", article.Insert)
}
测试
当这一切完成后就是运行测试了。
当然我们最好编写单元测试。
在 test 文件夹中,新建 article_test.go 测试文件。
package test

import (
	"GinHello/initRouter"
	"GinHello/model"
	"bytes"
	"encoding/json"
	"github.com/gin-gonic/gin"
	"gopkg.in/go-playground/assert.v1"
	"net/http"
	"net/http/httptest"
	"testing"
)

var router *gin.Engine

func init() {
	router = initRouter.SetupRouter()
}

func TestInsertArticle(t *testing.T) {
	article := model.Article{
		Type:    "go",
		Content: "hello gin",
	}
	marshal, _ := json.Marshal(article)
	w := httptest.NewRecorder()
	req := httptest.NewRequest(http.MethodPost, "/article", bytes.NewBufferString(string(marshal)))
	req.Header.Add("content-type", "application/json")
	router.ServeHTTP(w, req)
	assert.Equal(t, w.Code, http.StatusOK)
	assert.NotEqual(t, "{id:-1}", w.Body.String())
}
在测试用例里创建一个 article 对象,并且赋值,通过 json 方法建对象转换为 json,最后发起请求。
运行测试用例,如果我们的代码写的 没有问题的话,测试通过,并且数据库中会对应添加该数据。
当然你不想写单元测试也是可以的,可以通过 Postman 等来进行测试,这里给大家简单的介绍一下 GoLand Http 测试工具。
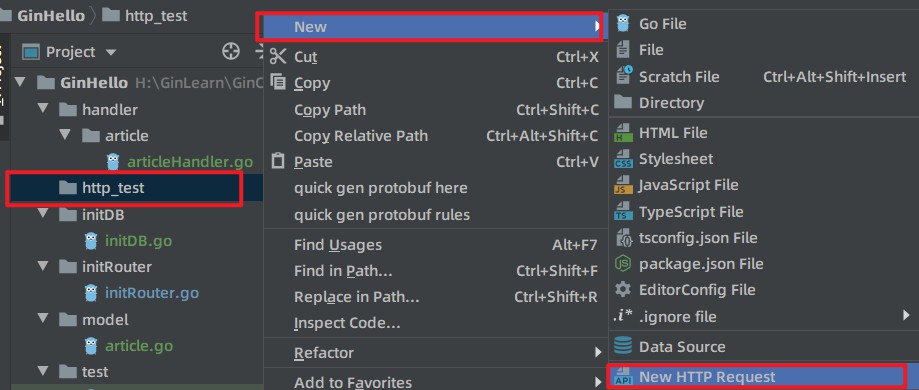
我们新建立一个 http_test 文件夹,在文件夹下面新建一个 .http 文件,命名为 article.http
对文件进行编写,编写如下,指定我们的请求地址,指定要求的数据。在POST 左侧就会出现一个 运行按钮,点击运行按钮,控制台会出现返回结果。运行该文件时,要将我们的项目启动起来。
POST http://localhost:8080/article
Content-Type: application/json

{
  "type": "go",
  "content": "Hello Go"
}
其他的 .http 文件的语法规则 请看官方文档。
这样就完成了第一个 restful 接口,同样可以完成其他的接口。其他的接口示例请看 Github 上代码。
总结
本章节主要讲述了如何构建一套 restful 接口,restful 接口对于现在的开发是越来越重要了,大量的接口都是 restful 风格。Github 上代码完成了查询,添加,删除等接口,篇幅有限,不展开多讲了。
